


In this week’s project I will restore the original Nintendo Gameboy. As a 90’s kid I thought it would be cool to restore a Gameboy. Or should I say retrore. I bought this one from Japan. It’s obviously dirty but it’s also very yellow no rust this time. With this rust would be very bad. However the screen is broken and it is missing a lot of vertical lines. Otherwise it seems to be fine. I had some issues with turning it on when I tested it but after I got it on, I’ve had no trouble. The batteries I used were probably dead. It’s also missing the screen cover/lens. I bought a new one https://amzn.to/2I61BTx
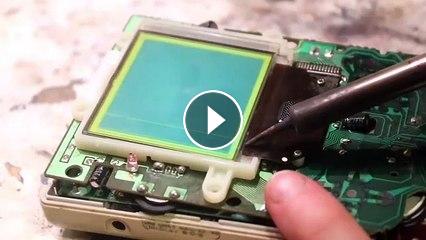
I started the restoration by opening the Gameboy. I needed Y1 screwdriver ( for example https://amzn.to/2D1SUWg) (my kit was bought locally and could't find that online). This was terrifying because I have almost no experience in this type of work, but one of the main reasons for this channel is for me to learn new stuff so that was intentional. I learned online this neat trick to fix the vertical missing lines. I’ve heard it doesn’t work or you can’t do it if you have horizontal empty lines. I used soldering iron to rub the area under the screen where the connections are. I used temperature of 300 Celsius. This is not a tutorial but a piece of entertainment and something to give you inspiration what to find out before starting project like this. In case you still want to use this as tutorial and risk ruining your Gameboy, keep the soldering iron constantly moving and don’t heat up one area for too long. There are grat tutorials about this on youtube. I probably didn’t have to take the ribbon cable off. I was just following a tutorial and realized it afterwards because I didn’t watch the whole tutorial before starting…
Next I disassembled the rest of the device and sunk the plastic shell (everything removed) into 12% hydrogen peroxide. And heated the solution in zip lock bag to 45-50. Water bath helped me to keep the temperature stable. Every once in a while I opened the bag to let the built up oxygen out to keep it from building pressure. Higher temperature or higher concentration of hydrogen peroxide will make the reaction faster but higher temperature will ruin your parts. I found that If you go much over 50 degrees celcius, your plastic will loose it’s original color. This method only removes the yellowing and the part won go all white. More temperature can also melt the plastic. There is also something called retrobright. It’s a paste or gel or whatever which combined to UV-light will have this same effect. Retrobright however has been reported to sometimes give uneven/patchy results and I didn’t want that since my parts were already very patchy. This worked beautifully, it got back the light gray color it used to have.
While putting it all back together I tested the screen once more to make sure it worked. The last line I had a lot of trouble with, had come back. This time it only took me like 5 minutes to get rid of it. Now the screen
Post your comment
Up Next
-
00:15

Có bao giờ bạn yêu một cô gái như thế này chưa
-
13:02
Creating A Project - Project Management Software Tutorial
-
25:42
Le Pigottine di Vanda - "Un thè in giardino" Tutorial n. 3 Primavera 2020
-
00:55
《FUNNY》 Running Man EP 376 | LEETEUK MUỐN THỂ HIỆN BẢN THÂN 1 CHÚT TẠI RUNNING MAN
-
03:59
DJ LEX Feat. Sergio Project - Macao (FL STUDIO PROJECT) ROMANIAN HOUSE STYLE
-
04:57

Mapa Brasileiro Para Euro Truck Simulator 2 - Versão 1.1.1
-
05:27

Funny Videos | Epic Fail Compilation 2014 | Funny Pranks Epic Fails 2014 Funny Fails Of The Week
-
01:08

تحميل برنامج حديقة الحروف والكلمات لتعليم الأطفال
-
06:05

Descargar Pokémon Oro Randomlocke ESPAÑOL Y TUTORIAL
-
03:57

Elodie Siby-Miroir aux alouettes (clip officiel)
Comments