


My After Effects Essentials mini-course is available now!
Learn more in the free webinar: ► https://www.diymoviemaking.com/pl/2147517057
Full DIY Moviemaking course will be coming soon!
► https://www.diymoviemaking.com
⚡ Instagram: @mrsteveramsden
⚡ Facebook: @diymoviemaking
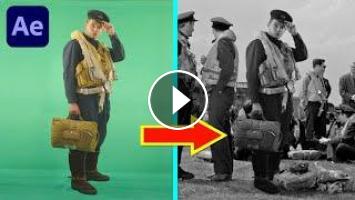
Steve Ramsden here and this week I’m going to show you how I added myself into a historical film, dressed as a World War 2 pilot!
So earlier this year I was contacted by a filmmaker who is making a documentary about the “Dam Busters”, the famous group of Royal Air Force pilots who bombed several German dams in a daring raid during World War 2. I was asked if I wanted to appear as one of the many pilots in the historical reconstruction sequences. So I agreed and was loaned a fantastic authentic RAF pilot’s costume to wear, and I had some fun playing a member of 617 Squadron while we filmed some various scenes from different angles to add me into the film.
This got me thinking I could try another fun green screen experiment similar to my previous videos:
How to Add Yourself to Movies: https://youtu.be/HK0ysV2Bfv4
Add Yourself to Historical Footage like Forrest Gump: https://youtu.be/fB0aWwmQ1VM
I found the perfect shot in the famous 1955 film The Dam Busters, which had much better quality footage of RAF pilots dressed exactly the same as me. So, I decided to try and join them using my Adobe After Effects skills. The first thing I did was to load the two takes into After Effects, find the sections I wanted, and scale down the shot of me to a good size using the Position and Scale controls, and place it above the clip from the film.
Next, because I wan’t moving very much, I could just draw a simple square mask over my figure to remove the edges showing the studio.
Next I could remove the green screen from the studio shot using Keylight. Then select the green colour to remove, change the view to Screen Matte, adjust the values under Clip Black and White settings until it’s a pretty good key, and then switch back to Intermediate Result to see how it looks.
Next I could add Lumetri Color and just do some simple alterations to match the other pilots. First I turned down the saturation to zero as we need black and white, and then increased the contrast and took the shadows down a little, and pretty soon I had a decent match.
To track the movement of the shot, I took the original layer and opened the Tracker panel. I selected the pack lying on the ground as a good point of reference, attached the track point and then analysed the clip forwards to see the movement. Then I applied this movement to a new Null object, and then parented the figure layer to this Null object. Now the figure has exactly the same subtle moves as the scene behind it and so it looks better.
Next I had a go at creating a subtle shadow for my character as well. To do this I duplicated the figure layer, turned on the 3D controls and was able to twist the figure around so that it looked flat. Then I could turn the exposure right down in Lumetri Color until it was completely dark, and line it up with the feet. Then by dropping the opacity right down and adding a blur, you get a pretty good instant basic shadow which moves in the same way as your character, because it’s the same footage! You can also duplicate this layer and with a different mask shape, add an even darker area closer to the character so that the shadow appears to get fainter the further away it gets.
Finally an important detail was to try and match the image quality of the original film. In the end I did this by adding the Noise effect, which I increased a little and unticked ‘Color Noise’, also the Dust and Scratches effect, and a little bit of camera lens blur. I also actually went back into Keylight and increased Screen Softness a little, to try and match the character’s edge with what the other pilots look like.
Finally this guy behind me is smoking and the smoke blows towards the camera in the wind, and it looked strange not to see this in front of my character too. So I added some subtle pre-keyed smoke over my layer at exactly the same moment. And then I was done and it was time to look back at the finished result, which I cut together with a few other shots from the film to make it feel more like a proper sequence.
So that’s how you can have some fun adding yourself into a historical film or some old footage. And if you want a crash course in how to use After Effects like I do, my mini-course is available over at diymoviemaking.com or via the link below. It's over 30 video lessons to get a complete beginner up and running quickly with the program Adobe After Effects to get results like I do in my VFX work, and it even comes with a downloadable selection of my footage to practice with. Happy moviemaking and I’ll see you next time!
#ArmisticeDay #RemembranceDay #RemembranceDay2021 #RemembranceSunday #VeteransDay
Learn more in the free webinar: ► https://www.diymoviemaking.com/pl/2147517057
Full DIY Moviemaking course will be coming soon!
► https://www.diymoviemaking.com
⚡ Instagram: @mrsteveramsden
⚡ Facebook: @diymoviemaking
Steve Ramsden here and this week I’m going to show you how I added myself into a historical film, dressed as a World War 2 pilot!
So earlier this year I was contacted by a filmmaker who is making a documentary about the “Dam Busters”, the famous group of Royal Air Force pilots who bombed several German dams in a daring raid during World War 2. I was asked if I wanted to appear as one of the many pilots in the historical reconstruction sequences. So I agreed and was loaned a fantastic authentic RAF pilot’s costume to wear, and I had some fun playing a member of 617 Squadron while we filmed some various scenes from different angles to add me into the film.
This got me thinking I could try another fun green screen experiment similar to my previous videos:
How to Add Yourself to Movies: https://youtu.be/HK0ysV2Bfv4
Add Yourself to Historical Footage like Forrest Gump: https://youtu.be/fB0aWwmQ1VM
I found the perfect shot in the famous 1955 film The Dam Busters, which had much better quality footage of RAF pilots dressed exactly the same as me. So, I decided to try and join them using my Adobe After Effects skills. The first thing I did was to load the two takes into After Effects, find the sections I wanted, and scale down the shot of me to a good size using the Position and Scale controls, and place it above the clip from the film.
Next, because I wan’t moving very much, I could just draw a simple square mask over my figure to remove the edges showing the studio.
Next I could remove the green screen from the studio shot using Keylight. Then select the green colour to remove, change the view to Screen Matte, adjust the values under Clip Black and White settings until it’s a pretty good key, and then switch back to Intermediate Result to see how it looks.
Next I could add Lumetri Color and just do some simple alterations to match the other pilots. First I turned down the saturation to zero as we need black and white, and then increased the contrast and took the shadows down a little, and pretty soon I had a decent match.
To track the movement of the shot, I took the original layer and opened the Tracker panel. I selected the pack lying on the ground as a good point of reference, attached the track point and then analysed the clip forwards to see the movement. Then I applied this movement to a new Null object, and then parented the figure layer to this Null object. Now the figure has exactly the same subtle moves as the scene behind it and so it looks better.
Next I had a go at creating a subtle shadow for my character as well. To do this I duplicated the figure layer, turned on the 3D controls and was able to twist the figure around so that it looked flat. Then I could turn the exposure right down in Lumetri Color until it was completely dark, and line it up with the feet. Then by dropping the opacity right down and adding a blur, you get a pretty good instant basic shadow which moves in the same way as your character, because it’s the same footage! You can also duplicate this layer and with a different mask shape, add an even darker area closer to the character so that the shadow appears to get fainter the further away it gets.
Finally an important detail was to try and match the image quality of the original film. In the end I did this by adding the Noise effect, which I increased a little and unticked ‘Color Noise’, also the Dust and Scratches effect, and a little bit of camera lens blur. I also actually went back into Keylight and increased Screen Softness a little, to try and match the character’s edge with what the other pilots look like.
Finally this guy behind me is smoking and the smoke blows towards the camera in the wind, and it looked strange not to see this in front of my character too. So I added some subtle pre-keyed smoke over my layer at exactly the same moment. And then I was done and it was time to look back at the finished result, which I cut together with a few other shots from the film to make it feel more like a proper sequence.
So that’s how you can have some fun adding yourself into a historical film or some old footage. And if you want a crash course in how to use After Effects like I do, my mini-course is available over at diymoviemaking.com or via the link below. It's over 30 video lessons to get a complete beginner up and running quickly with the program Adobe After Effects to get results like I do in my VFX work, and it even comes with a downloadable selection of my footage to practice with. Happy moviemaking and I’ll see you next time!
#ArmisticeDay #RemembranceDay #RemembranceDay2021 #RemembranceSunday #VeteransDay
Post your comment
Up Next
Autoplay
-
18:00

HUD Audio Spectrum in After Effects - After Effects Tutorial - Audio Visualizer In After Effects
-
19:57
Add yourself into any scene - Easy After Effects Tutorial
-
16:35
Motion Banner in After Effects - After Effects Tutorial - Easy Method
-
17:28
Retro Audio Visualizer in After Effects - After Effects Tutorial - Beginner Tutorial
-
25:19
Jogi Ho Gay Dittu Best Comedy Funny Video | bollywood | funny movies | comedy movies | New movie
-
04:57

Mapa Brasileiro Para Euro Truck Simulator 2 - Versão 1.1.1
-
05:27

Funny Videos | Epic Fail Compilation 2014 | Funny Pranks Epic Fails 2014 Funny Fails Of The Week
-
01:08
تحميل برنامج حديقة الحروف والكلمات لتعليم الأطفال
-
06:05
Descargar Pokémon Oro Randomlocke ESPAÑOL Y TUTORIAL
-
03:57
Elodie Siby-Miroir aux alouettes (clip officiel)
Comments